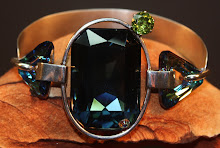
This piece is made using Swarovski crystals, sterling silver and a CZ. When I was looking through Artbeads.com collection of Swarovski I saw the large Montana Sapphire and new I had to use it in a project. I saw the triangular crystals and thought it would be great to make a bracelet using the triangles to connect the center piece to the band. I picked the Bermuda Blue as an accent to the rich deep blue of the center piece. When I received my order I was not disappointed in the least. The items looked even more beautiful in person. So many times something looks great on the site only to be very different in hand and being restricted to the home, I have great difficulty trying to see things in person. I have to have people and sites I can trust. With Artbead, as always, what you see is what you get. Their photo work is great and they show you the actual item in each color not just one and then a color chart. It makes it much easier to plan a new design.
I love Swarovski crystals and components and always have since first seeing them while living and traveling in Europe. My first experience was a shop in Innsbrook, Austria. They featured Swarovski and had all types of things made with them. The shop sparkled with the light bouncing off the many crystals throughout. The beauty was breathtaking. The building itself was a work of art over 400 years old. The huge beams of wood were worn smooth with all the years of hands rubbing across them. You just could not help but touch them hoping to absorb some of there mystic. This all added to the overall experience and I have always remembered it well. I guess some of the mystic did stick with me. When I was ready to step up my jewelry I automatically turned to Swarovski. I think you can understand why. It is truly the best. I have used it in many of my works.
The high quality of cut and clarity as well as the deep blue Montana sapphire color make this crystal exceptional to me. Of coarse all Swarovski is beautiful. When looking into the crystal you feel you are looking into a deep pool. With the cut the light sparkles off the bottom and looks like sunlight bouncing off jewels in the bottom of the pool. It is mesmerizing and you could look at it for hours. I wanted my design to look like the crystal is floating in air and not trap the spirit by closing it in on all sides. Thus the oval of silver. I cut slots in the oval to fit the corners so it would be held very securely. I added the silver pieces to the sides to hold the triangular crystals. These crystals have allot of color and depth as well. The colors range from shades of blue to a flash of green in the changing light. Much like the waters around Bermuda. When I decided to add the CZ I picked the green color to match. I also added the Swarovski AB crystal in the lower corner for an accent to the dark blue.It just seemed to bring out more of the deep blue. For the CZ I used a Tiffany 6 prong setting. With it sticking out I felt I needed a stronger mount then the standered. The AB crystal is set in a cut to hold it secure. For the band I used a brushed sterling silver. Being a solid band across the bottom of the wrist I did not want it to show small scratches from rubbing on hard surfaces. The entire piece was coated with Renaissance wax for protection. The band is connected with large half round sterling. The catch was made from one of the connectors being fashioned into a hook on the bottom side that slides in and out of the band connector hole. This makes it into a hidden latch.
Once again it is the beauty of the Swarovski crystal I got from Artbead.com that really makes this piece so beautiful. I just put it together. I hope you enjoy Montana Blue as much as I enjoyed making it. Rick
PS, At the same time I made my order I got some awesome black diamond Swarovski crystals. They were to large to work with the bracelet. I am going to use them in a separate piece or Even a set with bracelet, necklace and ring. I will write about it as well so watch for it.
Tuesday, October 27, 2009
Tuesday, September 15, 2009
The Light House
The Light House was a labor of love and learning. My sister-in-law, Judy, passed away from cancer the same time I was going through my ordeal in the hospital. My wife did not want to go to the services because I might not be around when she got back. I insisted she go. I knew it would be very important for her to be there and I wasn't planning on going anywhere. At least that was what I told her. I was pretty sure no one' up or down' wanted me at that time
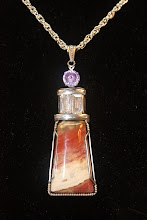
Since getting into jewelry making I have thought about a tribute to her of some kind. Nothing I was doing at the time seemed quit right. Judy loved Light Houses and the color purple. As far as beads and crystals I could get the color but not the Light House. As my learning and skills have improved I continued to look for the just right piece. Different ideas came and were discarded as not quite right. When I went to the gem show in Ozark I visited the booth of my good friend and mentor Jan Potter (Treasure Chest) and there on the table was a cab that I thought was perfect for the body of the Light House. Now came the problem of making it a Light House.
Again many ideas came and went as not being right. I wanted something that was perfect and suitable for the tribute. Finally I decided that I was going to make it from scratch. Yes, this was a big decision on my part not only from the importance of the piece but was I good enough to put it together. I told myself I had the tools and equipment needed. I had read the books and had taken some classes the only other element was to make my mind and hands work together. That's not always easy. I finalized a basic design and gathered the material together in one pile. I first thought about mounting the cab on a copper sheet then soldering the light part on top. I changed that in order to make the piece using all sterling silver. Then came the time to start cutting silver. Again just a little bit of fear involved here, but I over came this and started cutting. I ended up with about twenty parts in my project box, and yes, I did have to cut some twice to get them right. Learning curve, very large and long learning curve.
I had to consider the order of fabrication. This was my first time using multiple grades of silver solder. Silver solder comes in hard, medium, soft and I had a tube of low heat. The idea is that the first parts joined you use the hard solder and as you add more parts you step down so you don't remelt the other joints. Once I had all this lined out in my mind and all the pieces filed and shaped I gathered the courage to start putting things together. I did have a few starts and stops and redoes to correct mistakes but finally got the light section made. I used wire wrap to mount the cab with 20 gage silver wire and soldered this to the light section. Then things came to a halt. I could not come up with a roof idea that would look right and provide for hanging on a chain. I thought of copper since it would match the color of the cab. I even made several pieces but could not get it right.
One day we were at the Treasure Chest and they were showing me some new silver gem mounts they had just received. I fell in love with them and bought several of each. Jan was showing me some of the rings she made with these pieces. Shirely said she would really like one so we picked several CZ's to work with. When we returned home I went back to my roof problem. While thinking on this I was spreading out my new treasures to put in containers and one of them jumped out at me as being perfect for the top of the light house with a little modification. One of the CZ"s we had picked out was purple. Absolutely perfect. I soldered the mount in place added a bail. After cleaning up mistakes and polishing every thing I mounted the stones and made the chain to hang it from. Dispute some very small flaws it was as near perfect as I could make it. At the time I deemed it finished it was Shirley's mothers birthday. She wanted to give to her as a birthday gift. After some final polishing with Renaissance wax I boxed it up and handed it to Shirley who gave it to her mother on her birthday. It was a special moment if not for anyone else but me. I knew what went into making it and what it was to represent. At that moment I was very pleased with everything I had gone through to make it. It was very special and will remain in my heart as one of my favorite works.
Monday, August 17, 2009
Treasure Chest
Treasure Chest, a great name for a jewelry and lapidary supply store. Every time I go there (which is fare more often then my wife would like ) I feel like I am on a treasure hunt. I always scower the shelves and walls for anything new I just can not do without. When my basket starts to overflow my wife Say's I have enough stuff to last a year. My answer is always Yes but!!! She smiles and follows me to the cash register. She is always good to me.
They are located on the Plaza Shopping Center in Springfield, MO. and have been in the business for years. They are really great people, anyone in the business or hobby of jewelry fabrication should get to know them. Every one there knows their stuff and can help with the hardest of questions or even the dumb questions a newbie like myself will come up with. Several times I have gone there with a new project rattling around in the back of my head that won't quit jell. We talk thru it and generally find a solution. Of coarse I have to buy what I need to complete the project( and anything else that might fall into my lap). My wife rolls her eye's (what beautiful eye's they are. I know where my breads buttered) and I give her my Yes but!!! and we keep on shopping.
This place has just about anything you could want and a whole lot of things you didn't know you had to have until you see them. Jasper. agate,stone, gems, cabochons, in all types and colors. Everything from raw material to beautiful finished jewelry. Don't find the exact perfect stone they will order it or make what you want. They carry silver and gold fill in all shapes and sizes of wire, sheet and cast components. They have something for every skill level from beginner to master craftsman and they will help you to master new skills as well. They host class' with people like Jan Porter of Earth N Wire who teaches how to make wire wrap jewelry. Hers is the first class I took and it was a turning point in my life. She is great and has continued to help me to do bigger and better things.
Of coarse there are the tools. What I call the toy room. Yes I am a tool junky ( there is no known cure. I just have to live with it). They have tons of tools for every thing from basic hand tools to sophisticated lapidary tools. You think of it, they have it or will get it for you. I really can't say enough about them. They are really good people. Give them a call. 417-823-3800
One last thing. There store is set up for wheelchair access. Its great to be able to go around and look at things for my self. They also work with disabled Veterans and many of the schools in the area. Like I said good people to know.
Wednesday, August 5, 2009
Jewelry design and fabrication. What a wonderful hobby or profession. You get to work with and explore the many different types of jewelry, Rings, bracelets,necklace's,earrings, as well as many other forms. I also like exploring the many different methods used in jewelry design such as repousse, chasing, wire wrap, wire form jewelry as well as many others. In my learning process over the last several months I have tried to master as many different techniques as I could. I am mostly home bound with a disability so I have had to learn from books and trial and error. Yes I have thrown out allot of jewelry pieces that did not work but I am still ready to wade in with both feet. I have been able to take some class' but not as many as I would like. With some jewelry pieces I become obsessed and will make and rework for days until I get it right. My wife and family members think I am crazy sometimes because I can see flaws where they can't. It has been interesting going from simple wire and beads to fabricating pieces of jewelry from raw materials. It is very satisfying to finish a jewelry piece that is totally your own design. You get to where you look at something and see how it would make a great piece of jewelry, and then to be able to fabricate it into a finished piece is beyond explaining. I love it. Everything I've done to date has been one of a kind. I like it that way and will continue to make exclusive, one of a kind jewelry. I also enjoy taking old jewelry and turning it into something new. I have several pieces that have elements from old jewelry Incorporated into them. It is a great outing for me to go to flea markets and garage sales to hunt for treasures. I pick out something because it catches my eye or an idea comes to mind immediately without worrying what its made of. Sometimes you get something home and find out it is truly a treasure. Then again sometimes it is plastic. The main thing is to make it work in a beautiful jewelry design.
This blog is where I will showcase my jewelry designs. I will also be posting about the many different things I have learned and had to adapt to meet the needs of working from a wheelchair. I will also be showing allot of the tools I have modified and why. In my previous life I was an equipment designer. This has allowed me to take many things not necessarily meant for jewelry and turn them into very useful tools. I hope the rambling of this first blog post will not scare you away and you will return to see what is knew. The same as my jewelry has improved my posting will too. Hope to see you often.
This blog is where I will showcase my jewelry designs. I will also be posting about the many different things I have learned and had to adapt to meet the needs of working from a wheelchair. I will also be showing allot of the tools I have modified and why. In my previous life I was an equipment designer. This has allowed me to take many things not necessarily meant for jewelry and turn them into very useful tools. I hope the rambling of this first blog post will not scare you away and you will return to see what is knew. The same as my jewelry has improved my posting will too. Hope to see you often.
Subscribe to:
Posts (Atom)